01How it works
OpenXR is the open standard VR games use to talk to your headset. BeltTentioner installs a small OpenXR API layer, which is a DLL the OpenXR loader injects into every OpenXR game. The layer adds the overlay to the game's own frame submission, so it works on any OpenXR runtime (SteamVR, Oculus, WMR) without games needing special support.
- Zero CPU copy. Frames go GPU to GPU through a shared texture, so the game isn't slowed down.
- Only redraws when something changes. Idle panels cost nothing, and the frame rate is capped (30 fps by default).
- Transparent canvas. Only the panels are visible. Everything else is see-through.
- Reconnects itself. If you restart the game or the app, the overlay reappears automatically.
XR_KHR_D3D11_enable). Most OpenXR titles do. Direct3D 12 and Vulkan games aren't supported yet.02Turn it on
- Install and run BeltTentioner (Windows, x64). On every start it registers the OpenXR layer for your user account. This needs no admin rights and no manual install, and the layer files ship next to the app's exe.
- Open Settings → Preferences… and select the OpenXR tab.
- Tick “Enable OpenXR overlay” and save. The overlay now runs from app start. It's off by default.
- Launch your VR game. The status in Settings → OpenXR Overlay… changes from Waiting for OpenXR app… to Layer attached — live in VR.
- Press Recenter while looking straight ahead (or use your Recenter hotkey) so the overlay sits right in front of you.
XR_API_LAYER_PATH pointing at the app folder and XR_ENABLE_API_LAYERS=XR_APILAYER_NOVELTY_monoxr.03What you'll see
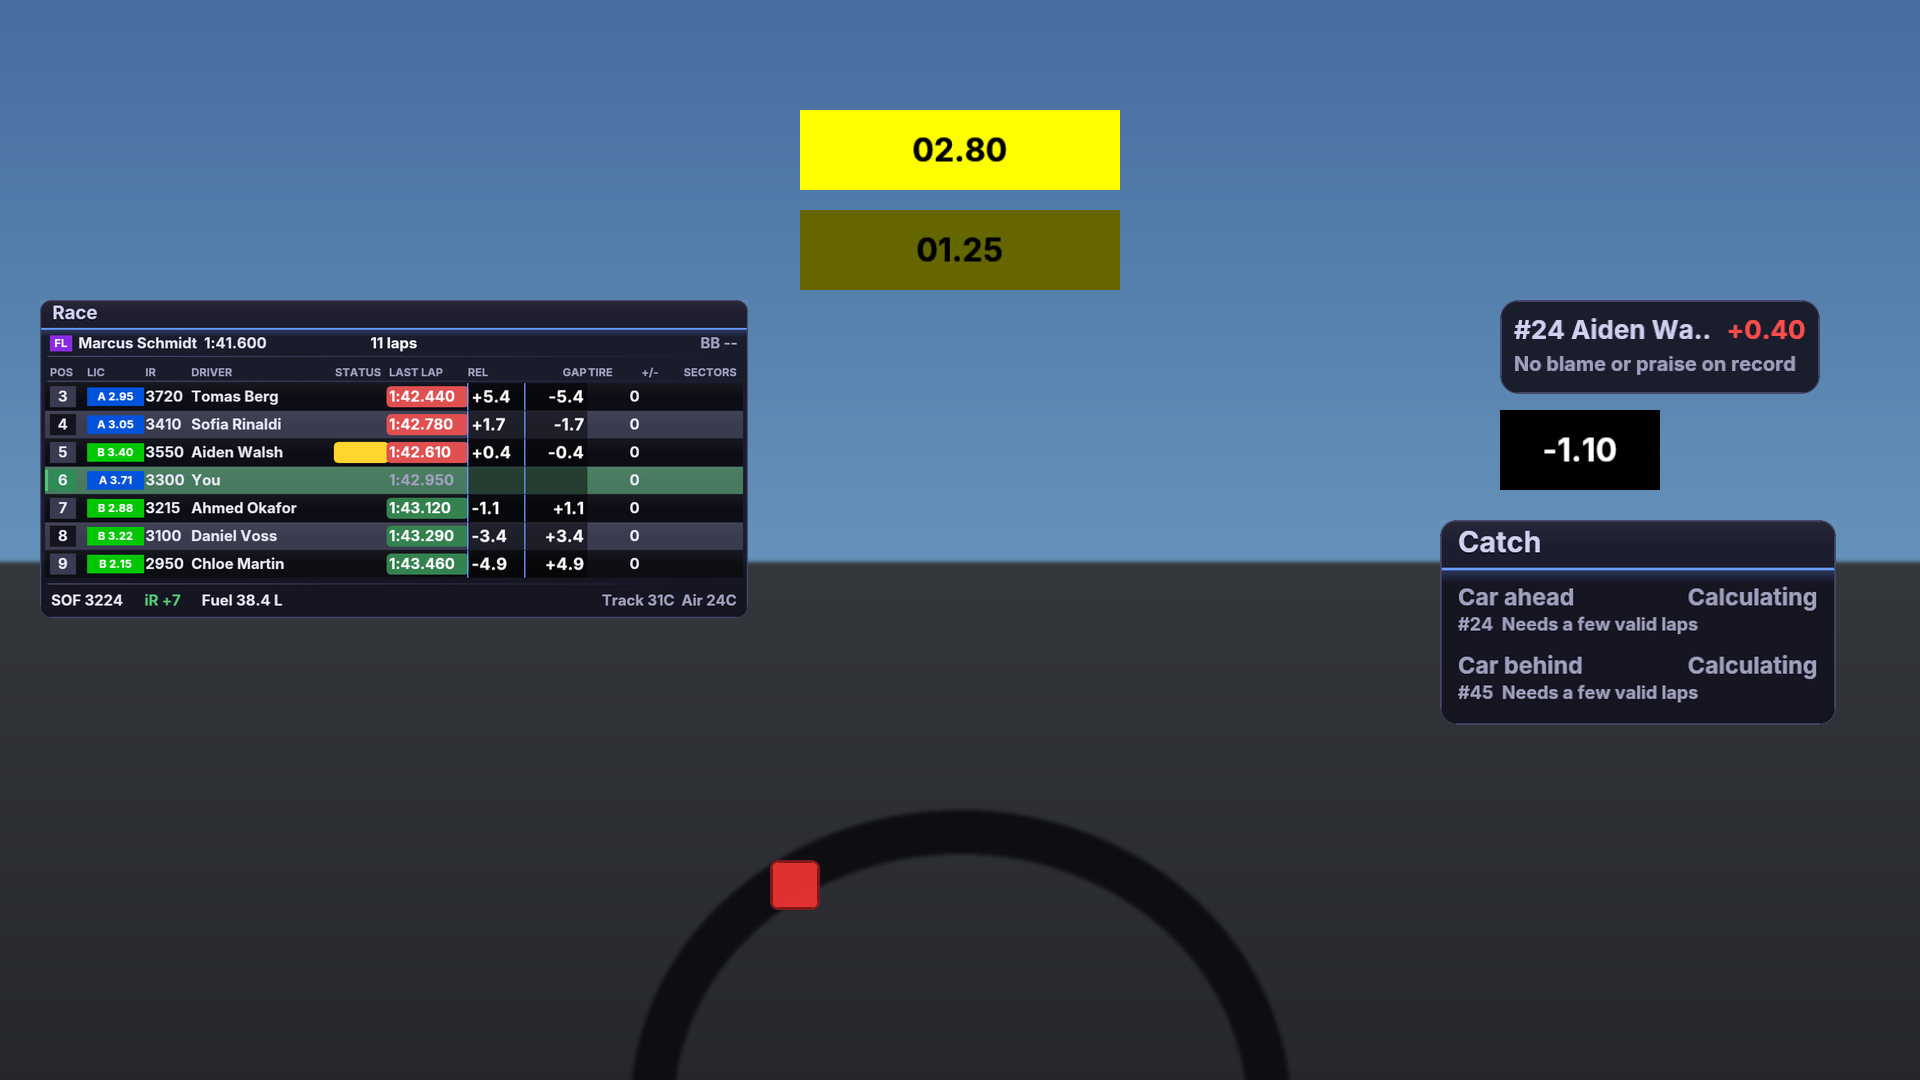
The panels float in front of you in the game, world-locked to where you last recentered. Each panel can be shown or hidden per session type (in car, practice, qualifying, race, replay).
04Position & edit your layout
Open Settings → OpenXR Overlay… for the editor. Its status line shows whether a game is attached and how many frames have been published.
| Control | What it does |
|---|---|
| Recenter | Centres the overlay on where your headset is looking right now. |
| Preview | Mirrors the overlay onto a desktop window so you can check it without a headset. |
| Edit | Turns on edit mode (see below). |
| Width / Height / Distance | Overlay size in metres and how far in front of you it floats. |
| X / Y offset | Shifts the overlay left/right or up/down from straight ahead. |
| DPI (px/m) | Sharpness. Higher is crisper but uses more GPU. |
| Editing for | Arrange a separate layout for In car, Practice, Qualifying, Race or Replay. |
| Calibrate mouse | Lines the red edit cursor up with the game's own VR cursor. |
Edit mode
Click Edit in the overlay window. A red frame marks every screen and every panel is outlined, including hidden ones, which show as a name and a Show button. Move the mouse over the game and drag a panel to move it. It works while the VR game has focus. Drag on empty canvas to draw a selection box around several panels. Positions are saved automatically, and Settings → Export / Import Overlay Layout… backs up or shares a layout.
Click a panel to select it and a button bar appears with:
- Collapse / Hide: collapse the panel to a small pill showing its name, or hide it.
- −, opacity %, +: make it more see-through (10–100%). Click the percentage to reset it.
- Eye / head button: choose per panel whether looking at it triggers the gaze effect (see HUD Settings below).
- Bind: press a controller or wheel button, or hold one and press another, to show and hide that panel. Click Bind again while it waits to clear it.
- Show: when the panel appears: practice, qualifying, race, replay or any mix. With none ticked it is always on.
The grip in a panel's bottom-right corner resizes it (40–300%). Right-click a panel for Center vertically, Center horizontally, Group / Ungroup for selected panels, Hide title bar, and the panel's own items (the Race box adds Hide headings).
Optional extras: a colour-blind mode, and gaze focus, where panels brighten, fade or grow depending on where you look. Add a Recenter overlay hotkey in Preferences → KeyBindings.
05Layouts: Flat, Curved and Triple
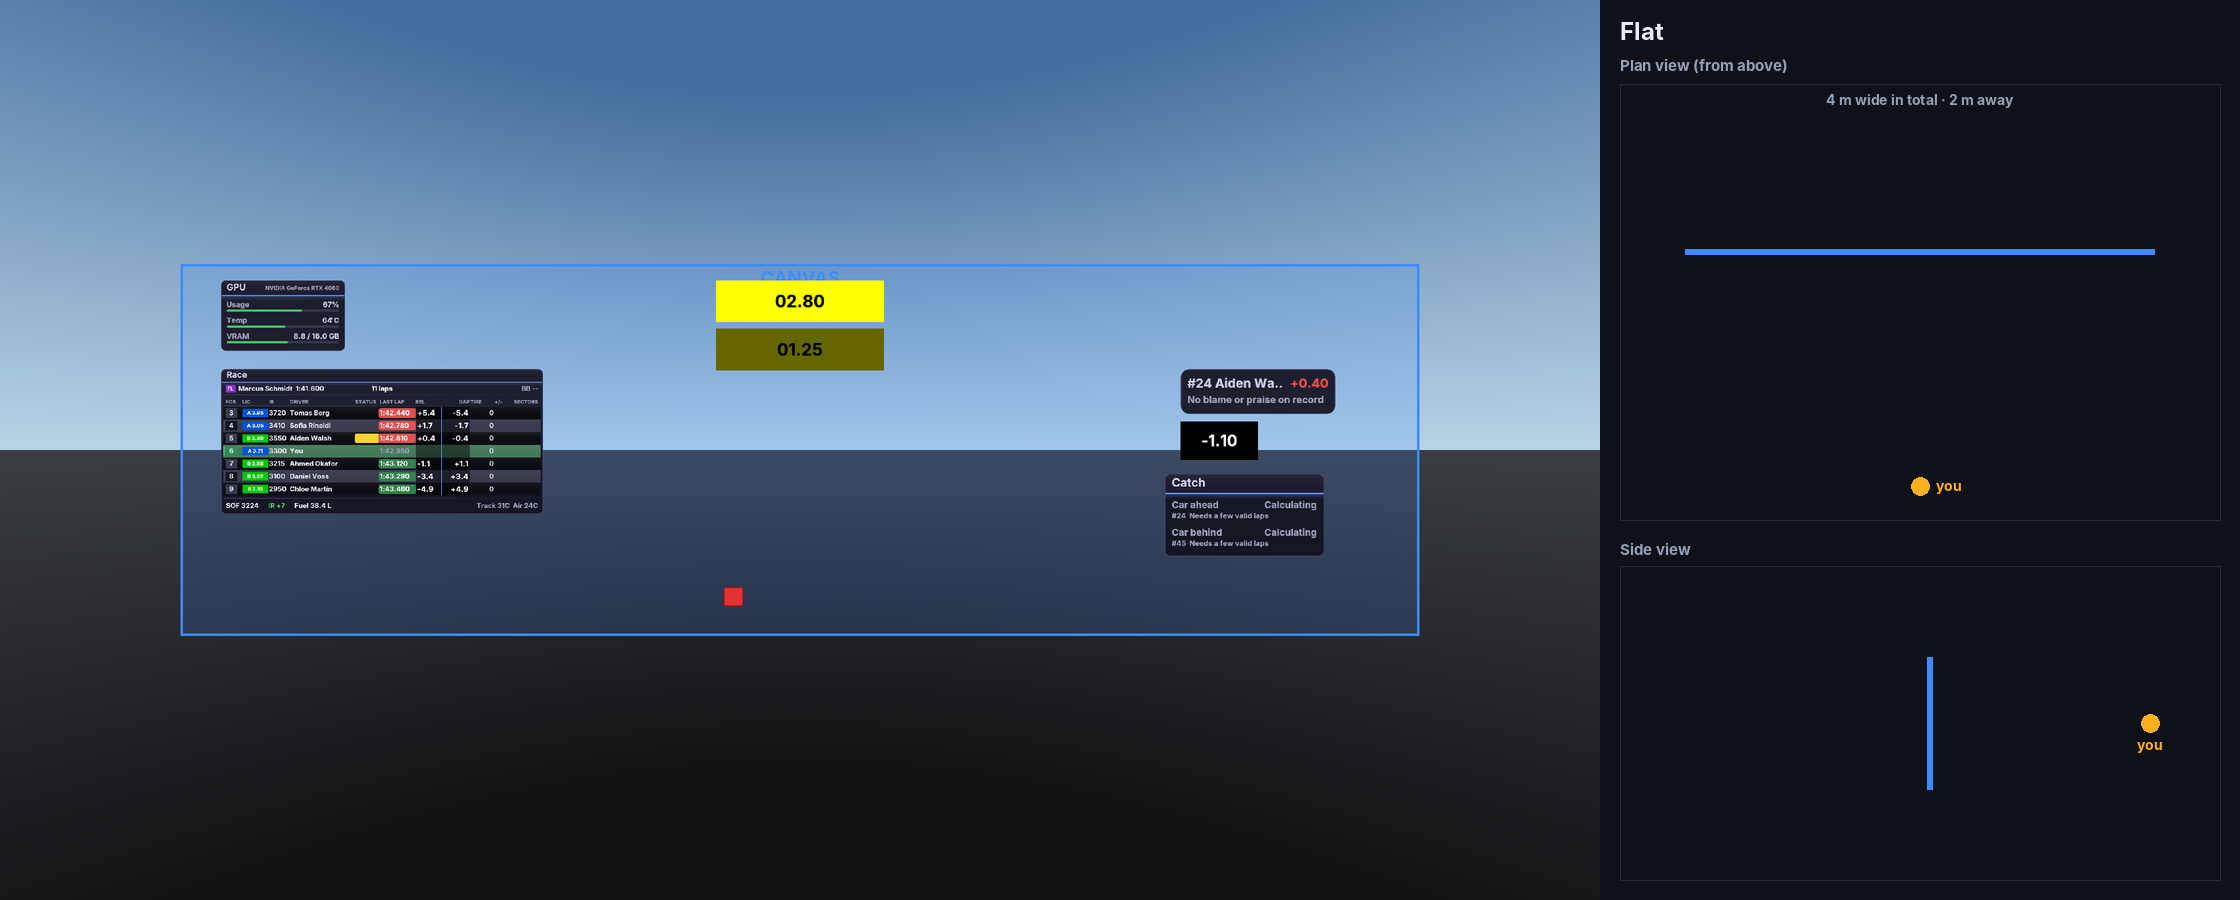
However it is shown, the overlay is one flat picture, the canvas, and your panels are placed on it. The Shape dropdown in Settings → OpenXR Overlay… only changes how that picture is displayed around you. You can switch shape at any time without rebuilding your panels.
Flat
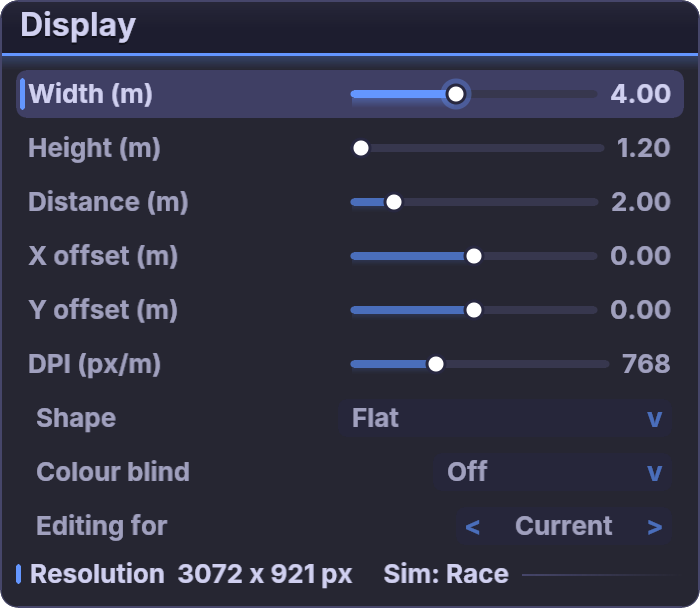
A single flat screen floating in front of you. Width and Height set its size in metres, Distance how far away it is, and X / Y offset slide it left/right and up/down. It's the simplest layout and works on every runtime.
Curved
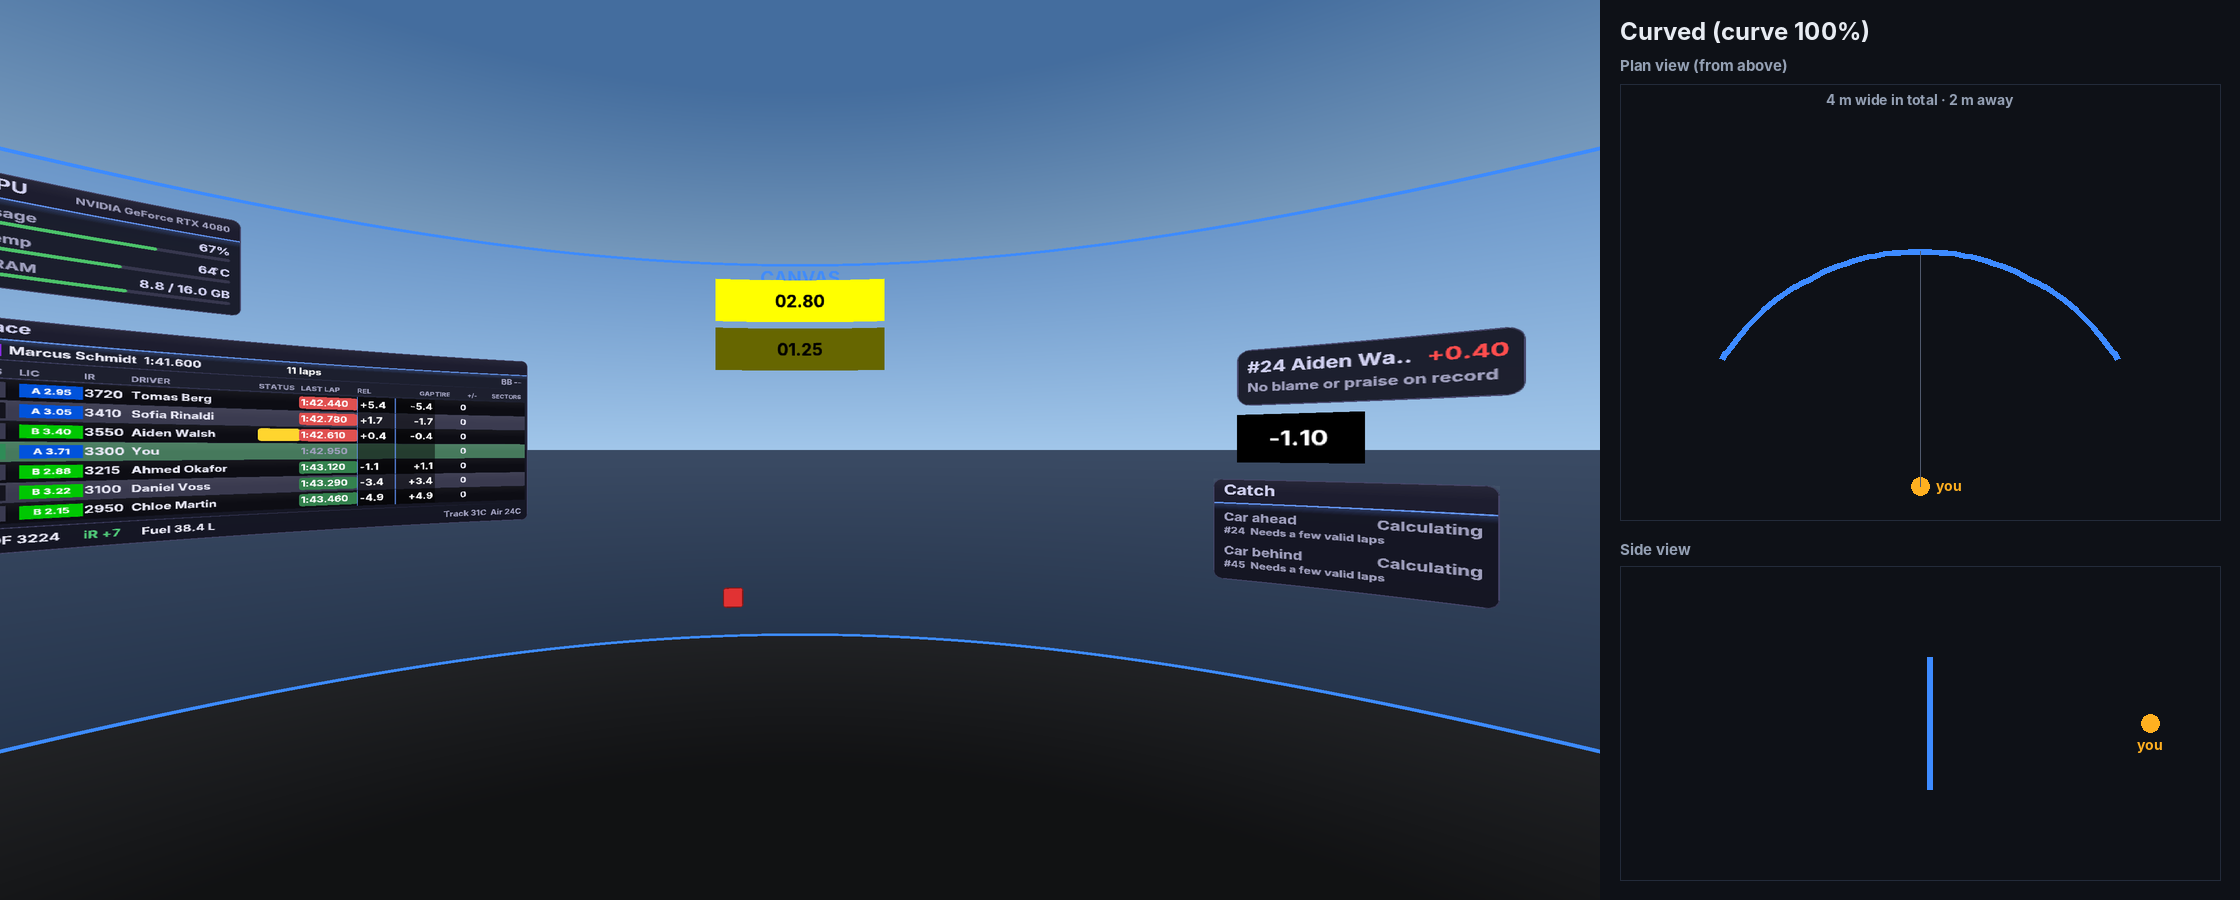
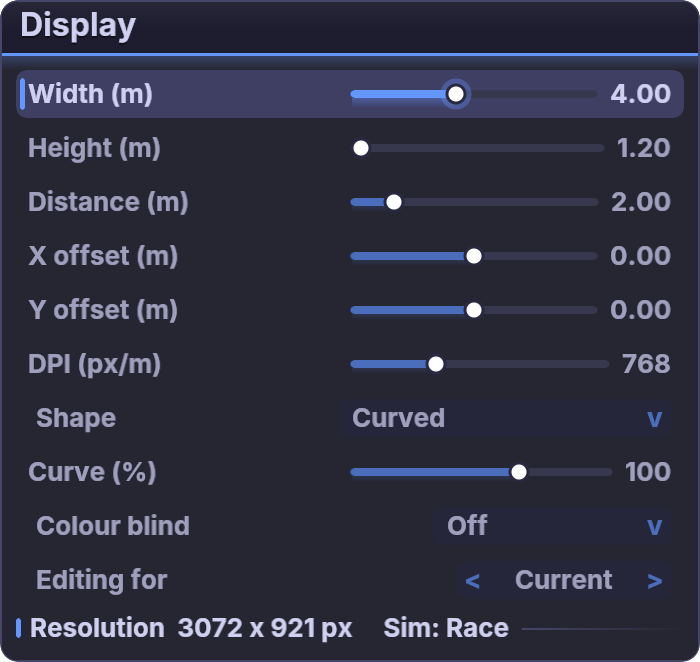
The same canvas wrapped around you on a cylinder, so the edges are as close to you as the middle. Width becomes the length of the arc. Curve (10–150%) sets how tight it is: at 100% the cylinder is centred on your head, so everything is the same distance from you. Lower is gentler and higher is tighter. X offset then slides the overlay around you along the arc.
Triple
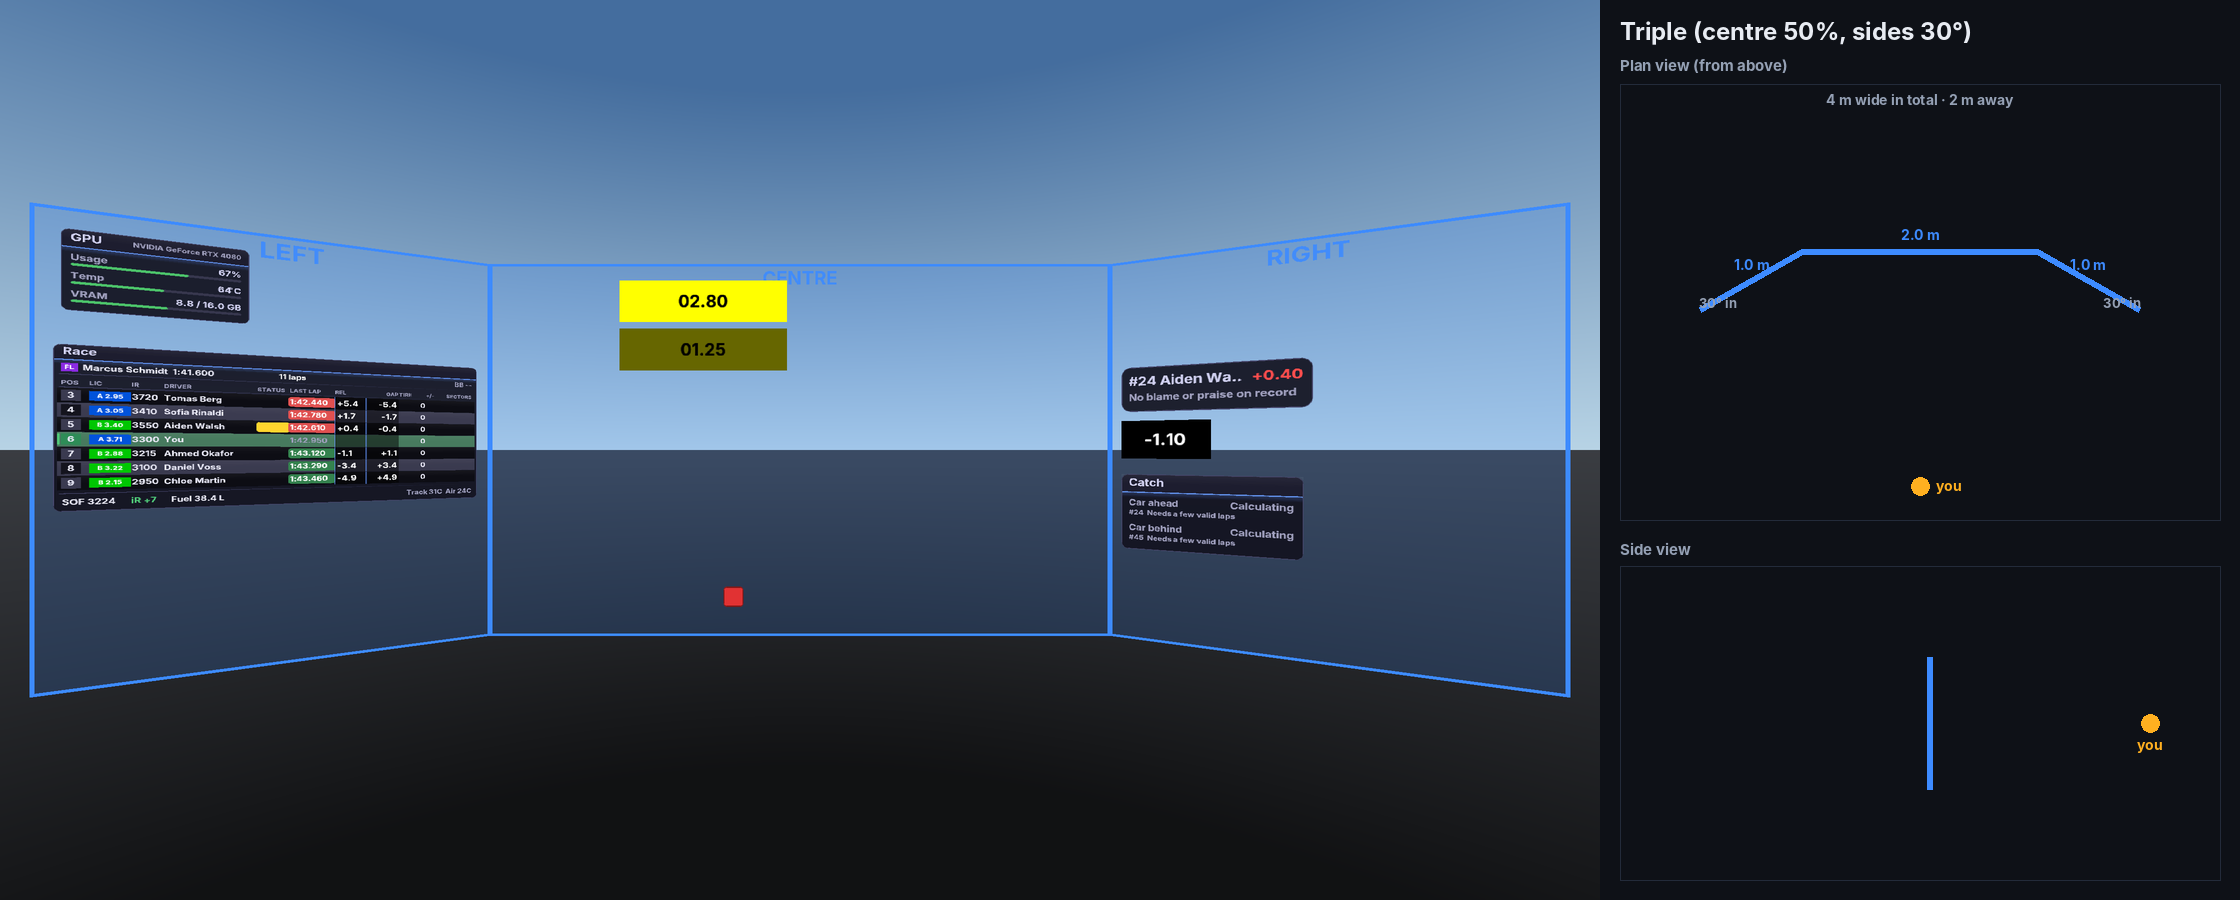
Like a triple-monitor rig. The canvas is cut into a left, centre and right part, and each part is its own flat screen. Width is all three laid side by side, and every screen shows the canvas at the same scale. Two settings shape it:
- Centre (20–90%): how much of the width the centre screen takes. The two outer screens share the rest equally.
- Sides turn (0–90°): how far the outer screens turn in toward you. They hinge on the edges of the centre screen. At 0° all three sit in one flat line, and at 90° they are side-on.
Panels can sit on any screen. Their saved positions are measured from the top-left corner of the centre screen, so they stay with the centre screen when you change the layout, and a panel on the left screen has a negative X.
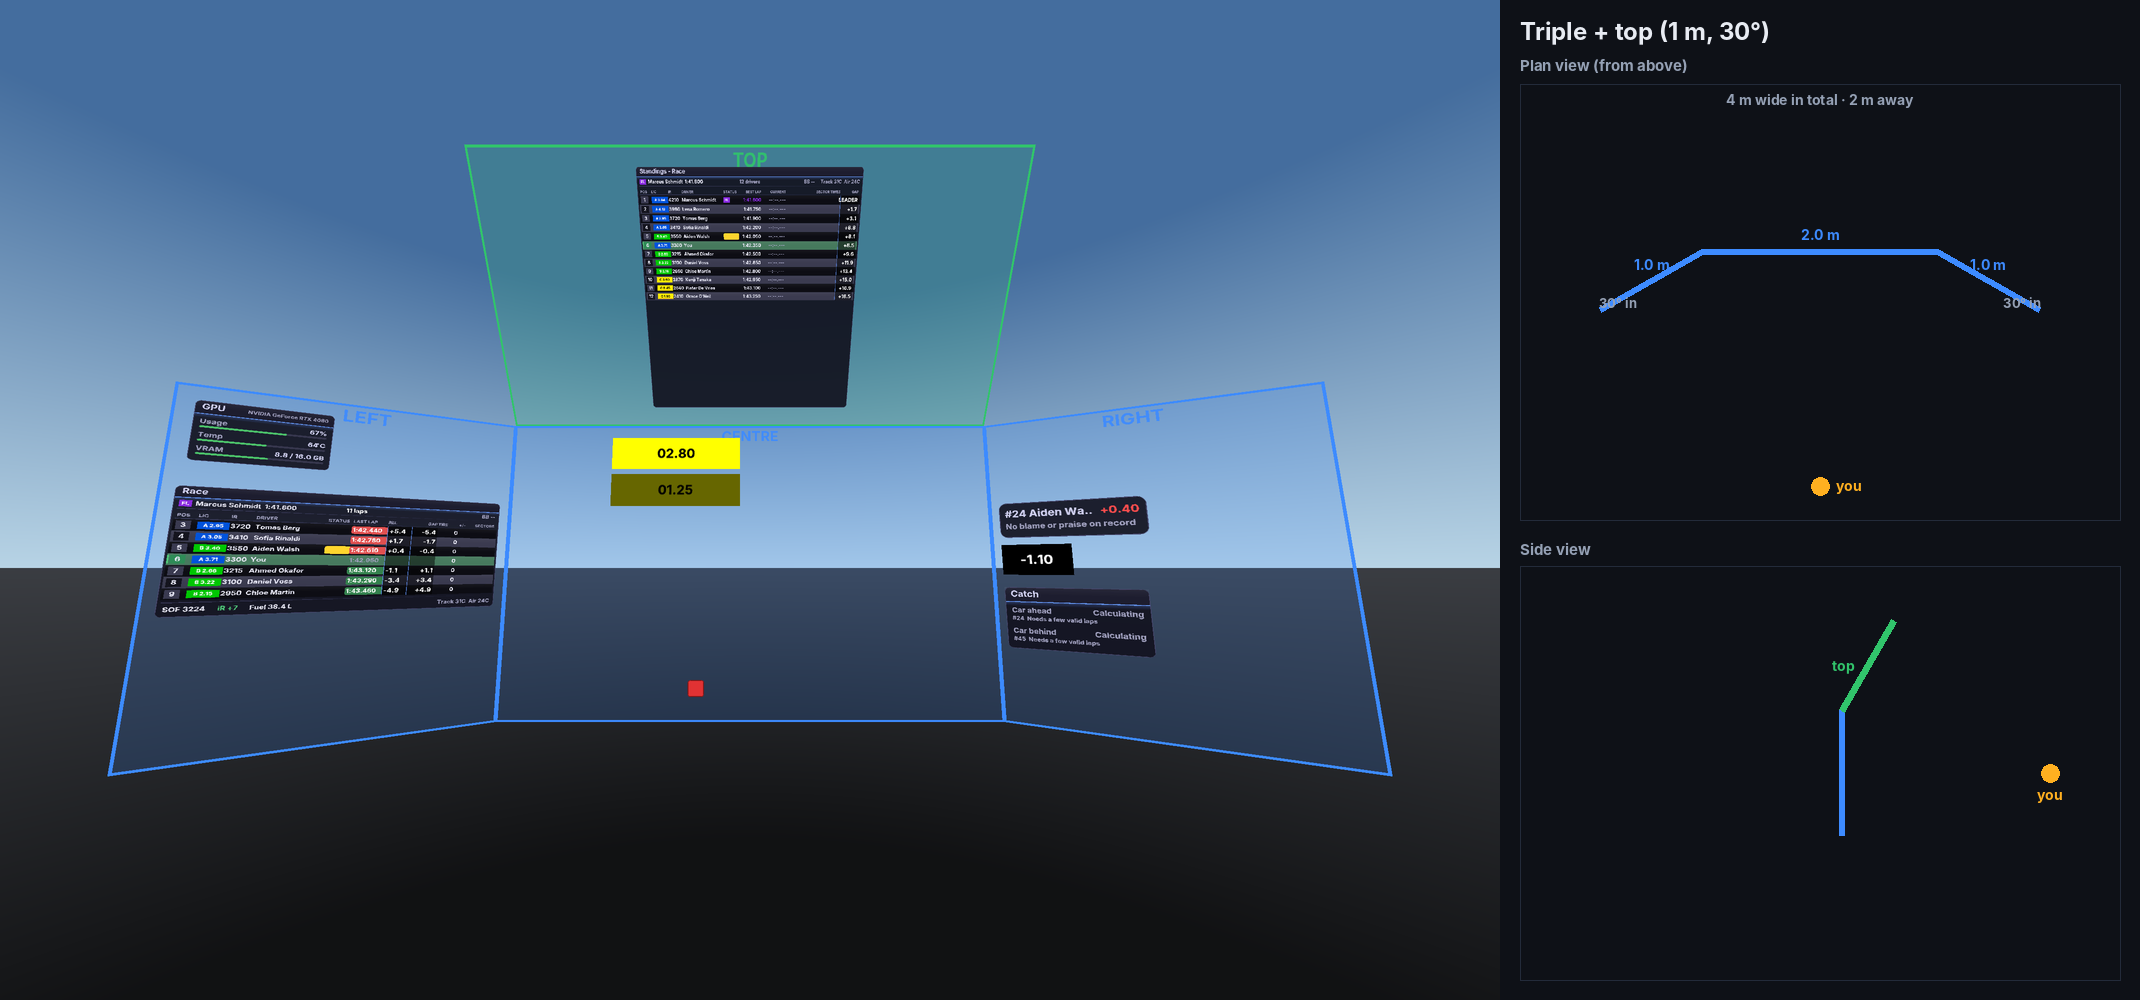
Triple + top
Adds a fourth screen above the centre one, as wide as the centre screen. Height (0.2–4 m) sets how tall it is. Tilt forward (0–90°) tips it toward you: 0° is upright and 90° faces straight down. It hinges on the top edge of the centre screen. Its picture is an extra band along the top of the canvas, which is where to put the panels you only glance at, such as standings. In edit mode you reach it by moving the cursor up past the other screens.
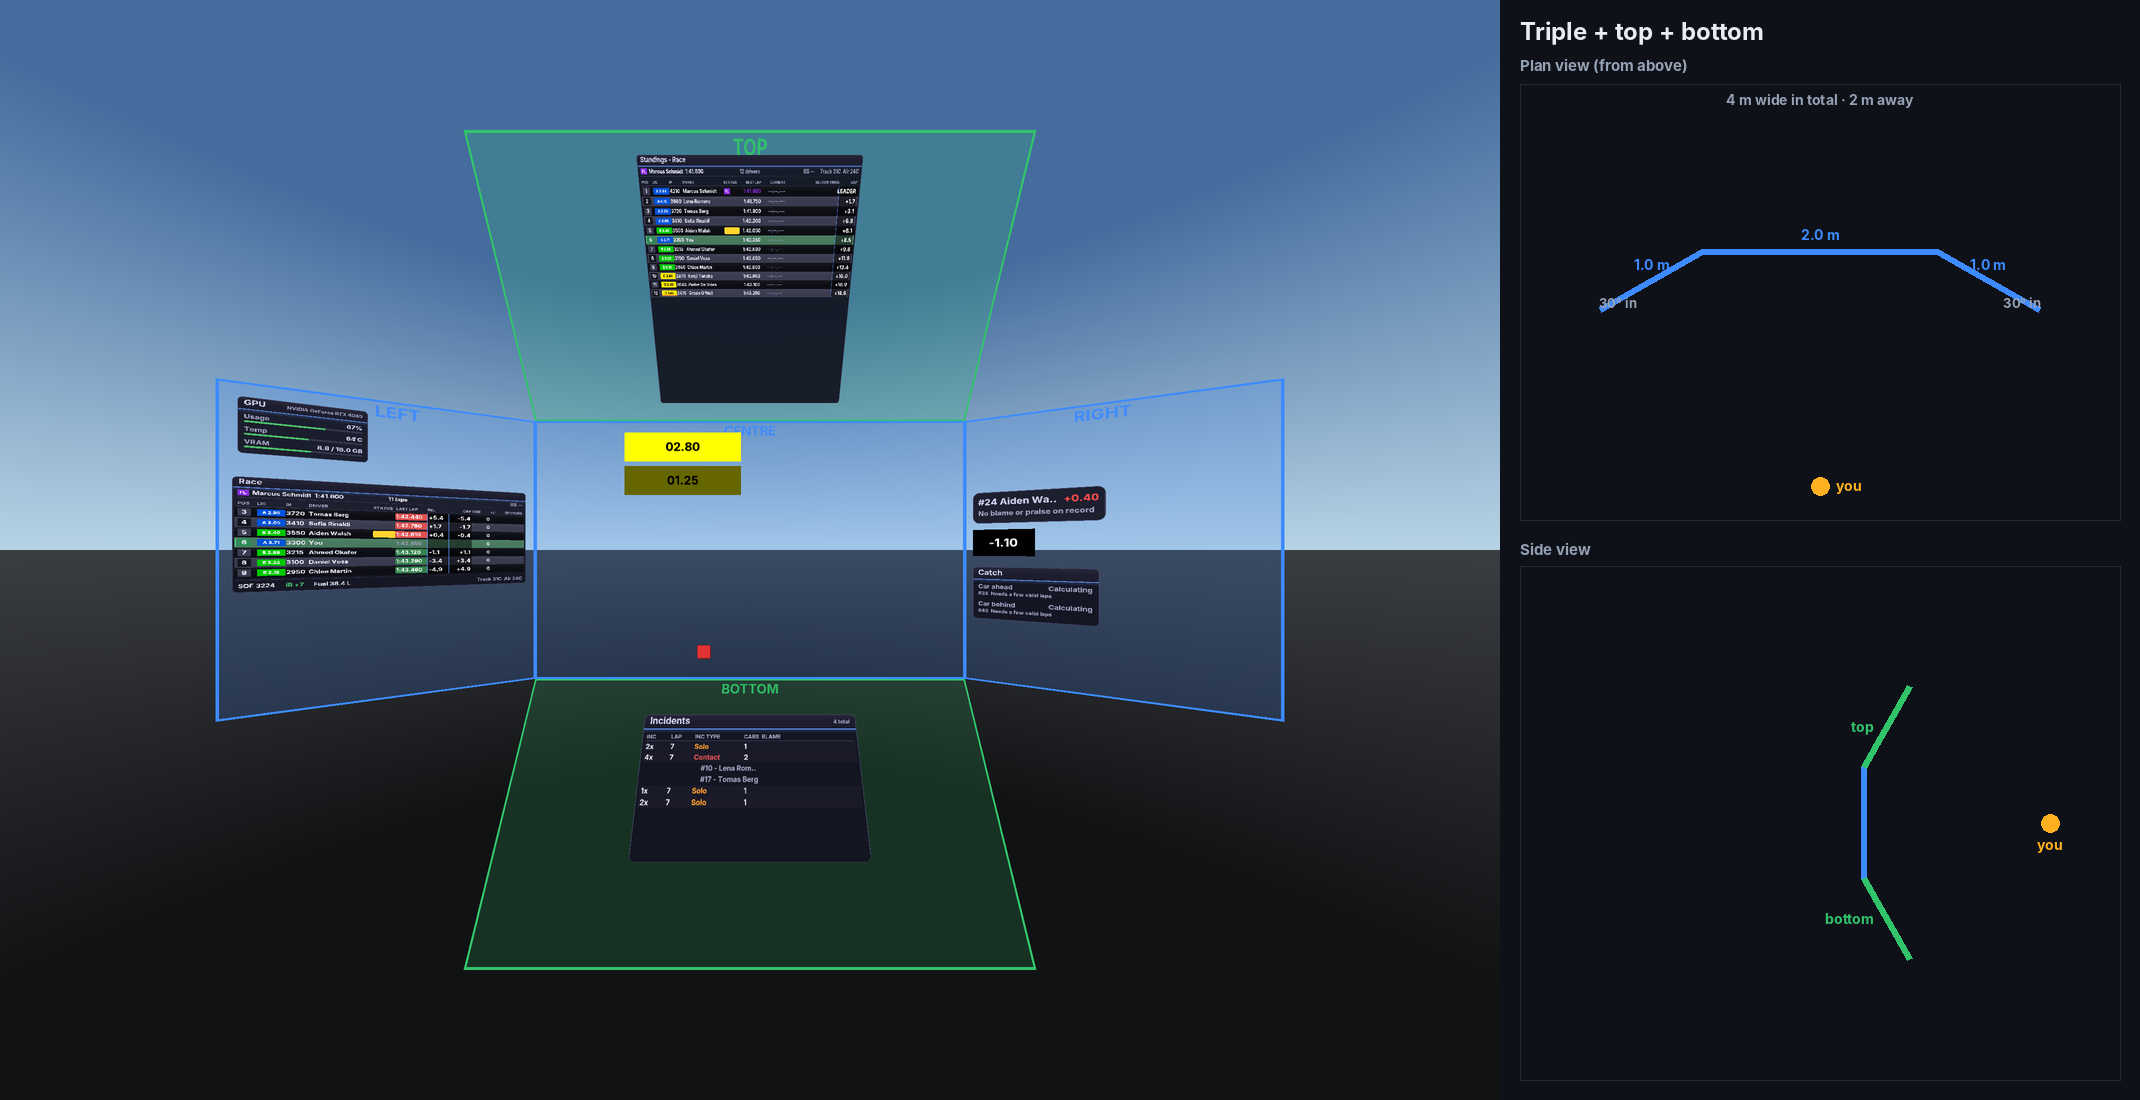
Triple + bottom, and top + bottom
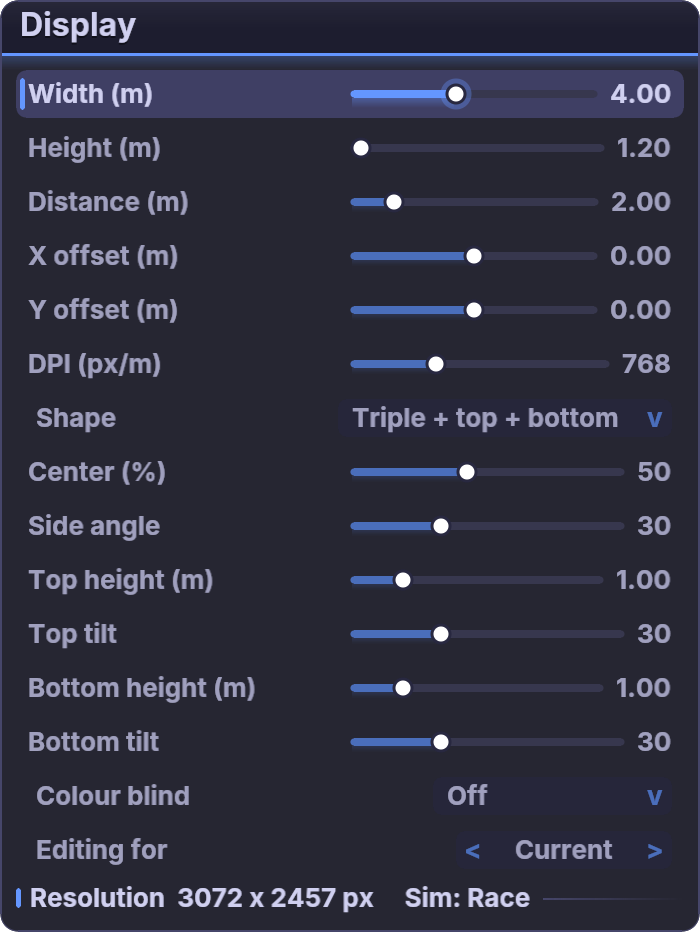
Triple + bottom mirrors the top screen: a screen below the centre one, as wide as the centre screen. It is Height metres tall and tipped back toward you by Tilt so it faces up, like a screen on your lap. Choose Triple + top + bottom for both. Each extra screen adds a band to the canvas, and the main screens still show the part between them.
06Available panels
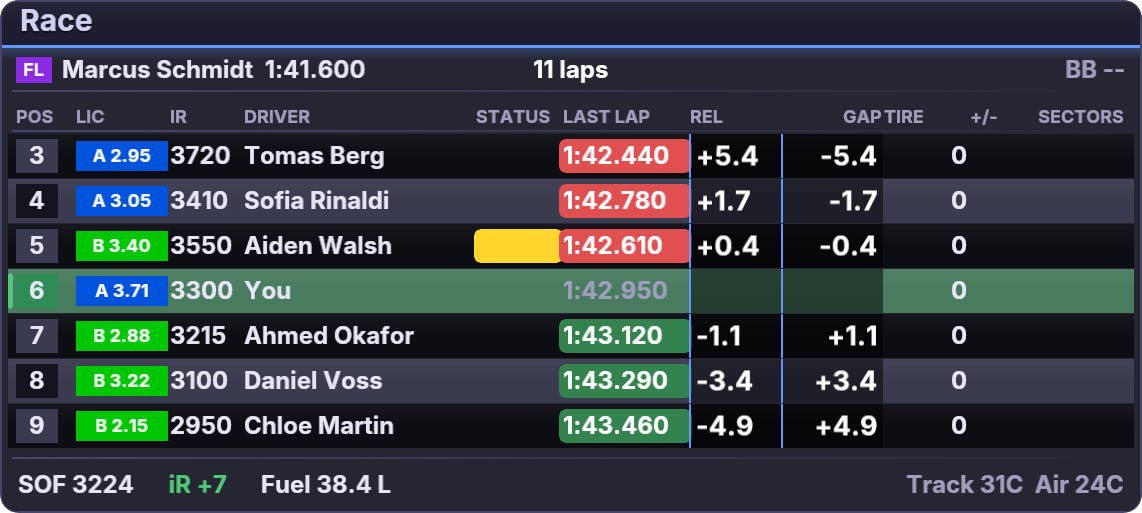
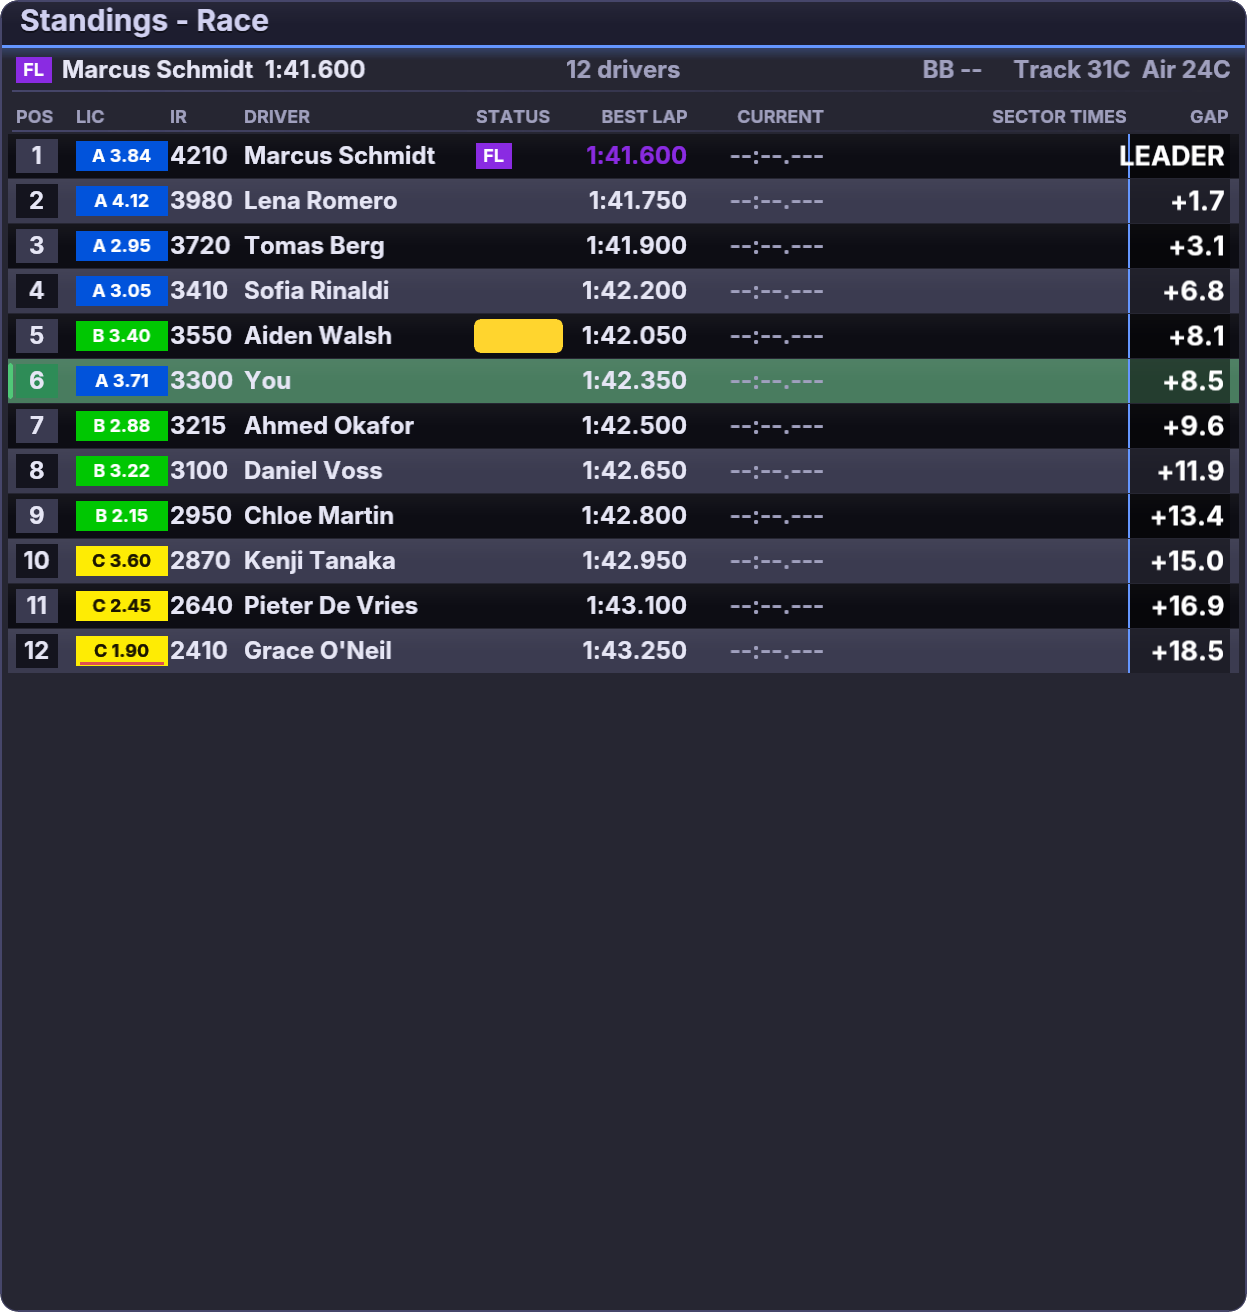
Each of these is rendered by the app's own panel code.



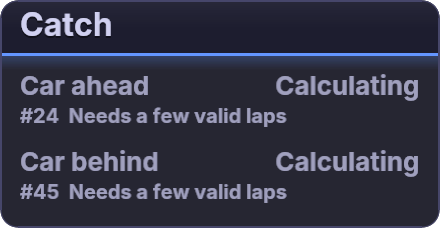
There is also a YouTube Chat panel, plus settings panels for the belt, HUD, display and head tracking that you can use from inside VR.
07Settings panels
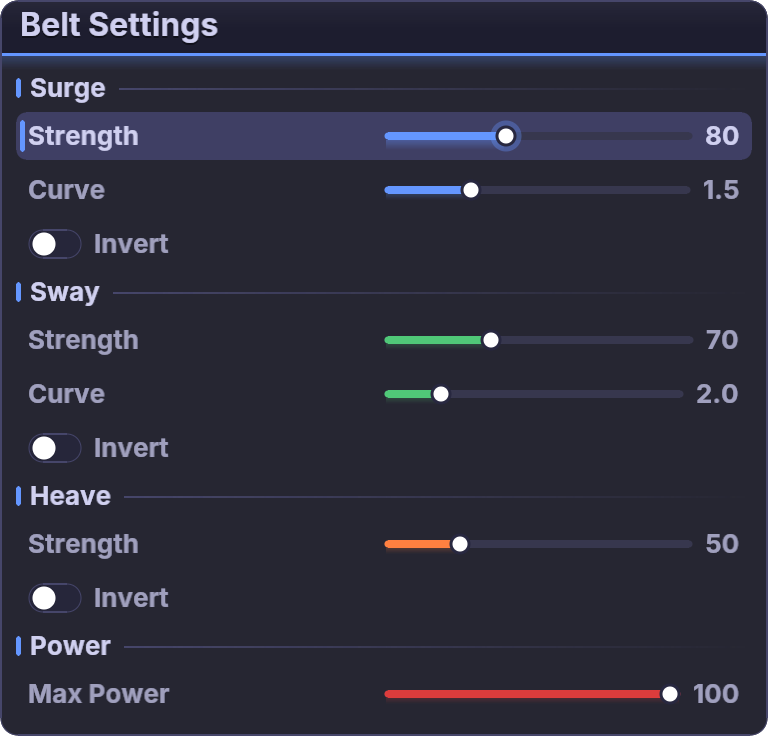
Five panels let you change settings from inside the headset, so you never have to take it off. Changes go through the same settings as the desktop app, so both stay in step and everything is saved. To adjust a value, use the mouse cursor over the game window, or the navigation keys you set in Preferences → KeyBindings (up, down, increase, decrease, next and previous control).
- Belt Settings and Wind Settings are ordinary panels. They're only created if the Belt Tentioner or Wind feature is on in Preferences → Features.
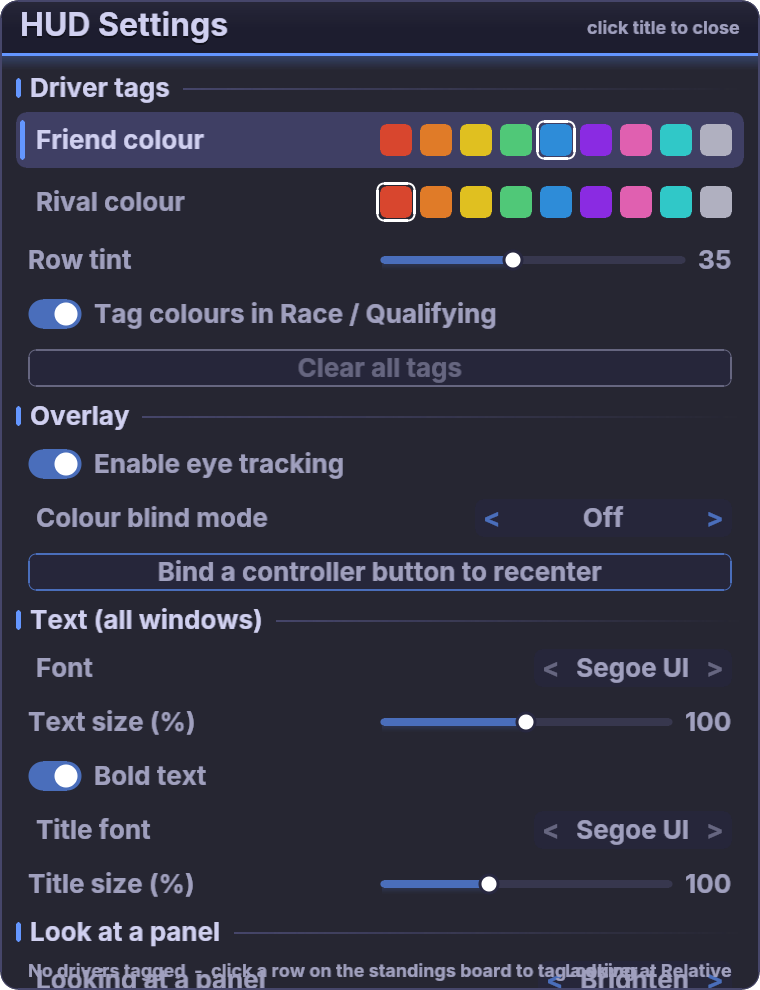
- HUD Settings is a tab on the left edge. It starts collapsed. Click its pill to open it and click its title to close it again.
- Display (right edge) and Head Tracking (left edge) only appear in edit mode.
Belt Settings
| Option | What it does |
|---|---|
| Surge: Strength (1–200) | How hard the belts pull for braking and acceleration. Braking tightens both belts and accelerating loosens them. |
| Surge: Curve (0.1–5) | Shapes the response. The output is the force raised to the power of the curve. 1.0 is a straight line. Above 1 keeps light braking gentle and saves the pull for hard stops. Below 1 makes light braking felt more. |
| Sway: Strength, Curve (curve 0.1–10) | The same two settings for cornering. A left turn tightens the right belt and a right turn tightens the left. |
| Heave: Strength | Pull from vertical motion: bumps, crests and compressions. |
| Invert (each axis) | Reverses the direction of that effect, if it feels backwards in your rig. |
| Power: Max Power (1–100) | The ceiling for belt force. Nothing pulls harder than this, so turn it down first if it's too strong. |
Wind Settings
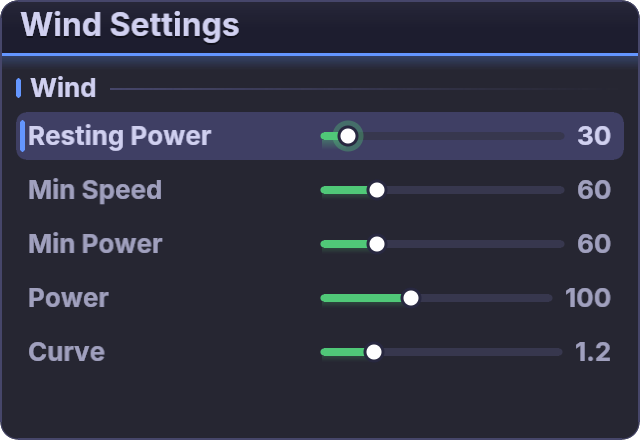
Fan power runs from 0 to 255. Below Min Speed the fan sits at Resting Power. From Min Speed upward the power rises from Min Power to Power as you approach top speed.
| Option | What it does |
|---|---|
| Resting Power | The idle breeze below Min Speed. 0 is off. |
| Min Speed | The speed where wind starts to build. |
| Min Power | Fan power the moment you reach Min Speed. |
| Power | Fan power at top speed. |
| Curve (0.1–5) | How the power climbs between Min Power and Power. 1.0 is a straight ramp. Above 1 it stays gentle until high speed and then builds. Below 1 it builds early. |
HUD Settings

| Option | What it does |
|---|---|
| Friend colour, Rival colour | The colour a driver you've tagged is painted in on the standings board, picked from nine colours. |
| Row tint (0–80%) | How strongly that colour fills the driver's row. |
| Tag colours in Race / Qualifying | Also paint tagged drivers in the Race box. The standings board always does. |
| Clear all tags | Removes every friend and rival tag. It's greyed out when nobody is tagged. |
| Enable eye tracking | The master switch for gaze focus. While it is off, panels ignore where you look and the "Looking at a panel" rows are greyed out. While it is on, each panel uses its own setting from the eye button in edit mode: off, head direction, or true eye gaze on headsets that have it (it falls back to head direction when no eye data arrives). |
| Colour blind mode | Off, Deuteranopia or Tritanomaly. Swaps the status colours for ones that are easier to tell apart. |
| Recenter button | Click it, then press a controller button to bind it to Recenter. Click again to clear. |
| Font, Text size, Bold text | The typeface, size (70–130%) and weight of text in every panel. |
| Title font, Title size | The same for window titles (70–150%). |
| Looking at a panel | What looking at a panel does: Nothing, Brighten (the others fade), Enlarge, or Both. |
| Faded opacity (5–100%) | How faint the panels you aren't looking at become. |
| Enlarge by (100–160%) | How much the panel you look at grows. |
Gaze focus only works for panels you switch on with the eye button in edit mode (the footer of HUD Settings says why nothing is happening if it is idle), and a panel has to be looked at for about a tenth of a second before it takes focus. It keeps focus for a moment after you look away, so a glance at the road doesn't drop the panel you were reading.
Display
The in-VR copy of the overlay window's edit panel. It only exists in edit mode. Pick a Shape and the rows for that shape appear under it.
| Option | What it does |
|---|---|
| Width, Height, Distance (m) | The overlay's size (at least 1 m) and how far in front of you it floats (0.25–10 m). For Triple, Width is all three screens side by side. |
| Shape | Flat, Curved (not on SteamVR), Triple, Triple + top, Triple + bottom or Triple + top + bottom. See Layouts above. |
| Curve (%) | Curved only: 10–150%. How tightly it wraps around you. Not available on SteamVR, which has no curved overlays. |
| Center (%), Side angle | Triple shapes: the centre screen's share of the width (20–90%) and how far the side screens turn in (0–90°). |
| Top / Bottom height, tilt | The extra screens' height (0.2–4 m) and tilt toward you (0–90°). |
| X offset, Y offset (m) | Slide the overlay left/right or up/down by up to 5 m. On Curved, X moves it around you along the arc. |
| DPI (px/m) | Sharpness, 128–2048. The canvas resolution is the display size times the DPI, and the readout under the sliders shows the result. |
| Colour blind | The same colour-blind mode as in HUD Settings. |
| Editing for | Arrange a separate layout for Current (follows the sim), In car, Practice, Qualifying, Race or Replay. Panels that don't apply to the chosen state are hidden, so each state can have its own arrangement. |
Head Tracking (experimental)
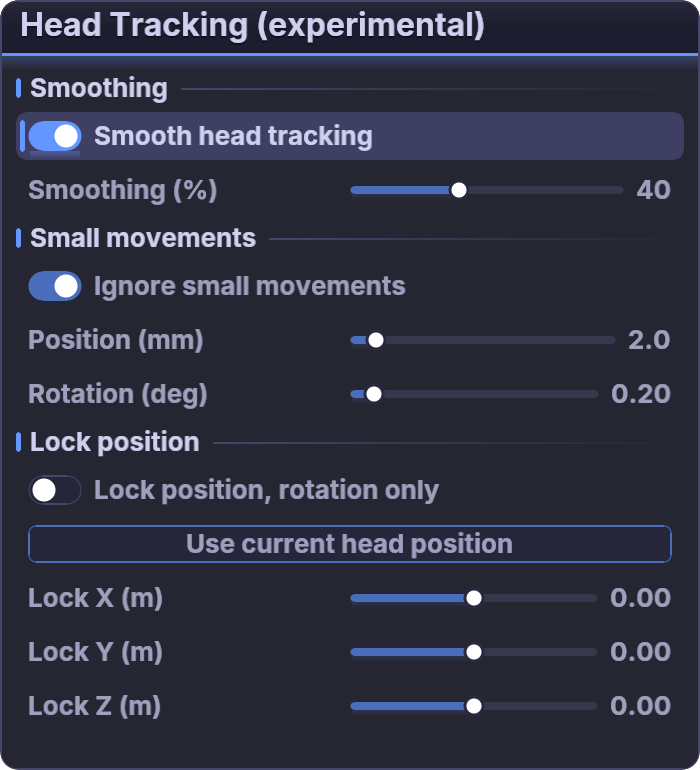
This filters the head position the game receives. The overlay itself always uses your real tracking. It needs a game started with the current layer.
| Option | What it does |
|---|---|
| Smooth head tracking, Smoothing (0–100%) | Eases the view toward your real position to remove jitter. The cost is a little lag, up to about a quarter of a second at 100%. |
| Ignore small movements, Position (0–20 mm), Rotation (0–2°) | The view holds still until your head has moved further than these minimums, which steadies the picture in a seated rig. |
| Lock position, rotation only | Ignores position tracking. You can still look around, but your head stays at the locked spot. |
| Use current head position, Lock X / Y / Z (±2 m) | Copies where your head is now into the lock position, which you can then fine-tune. |
08Customise the Race box
The Race box is the Relative panel. It's one panel that changes with the session. In a race its title is Race and it shows the cars around you with licence, iRating, status, laps, gaps, tyre, positions gained and sectors. The footer shows strength of field, an iRating estimate, fuel and temperatures. In practice and qualifying it switches to Qualifying or Practice and ranks by best lap, with a sector strip in the footer.
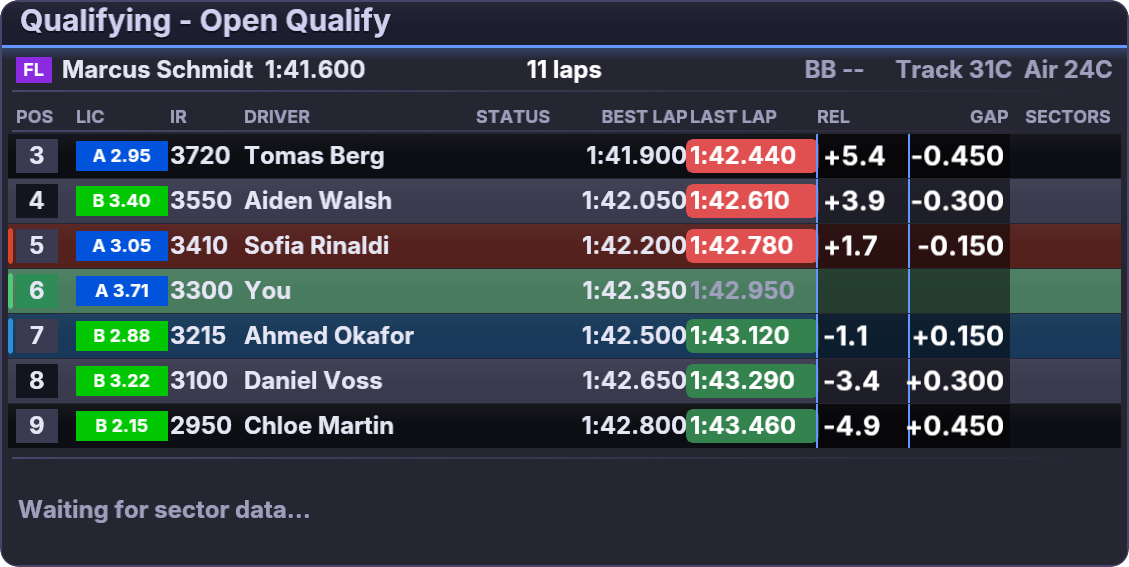
Everything below is done in edit mode (see Position & edit your layout) and is saved with your layout.
Choose and reorder the columns
- Reorder: press a column heading and drag it. It swaps places as it passes its neighbour.
- Hide or show: right-click a heading and pick Hide …. Right-click any heading again to Show a hidden column. At least one column always stays.
- Names: right-click the Driver heading to write names as John Smith, J. Smith or Smith.
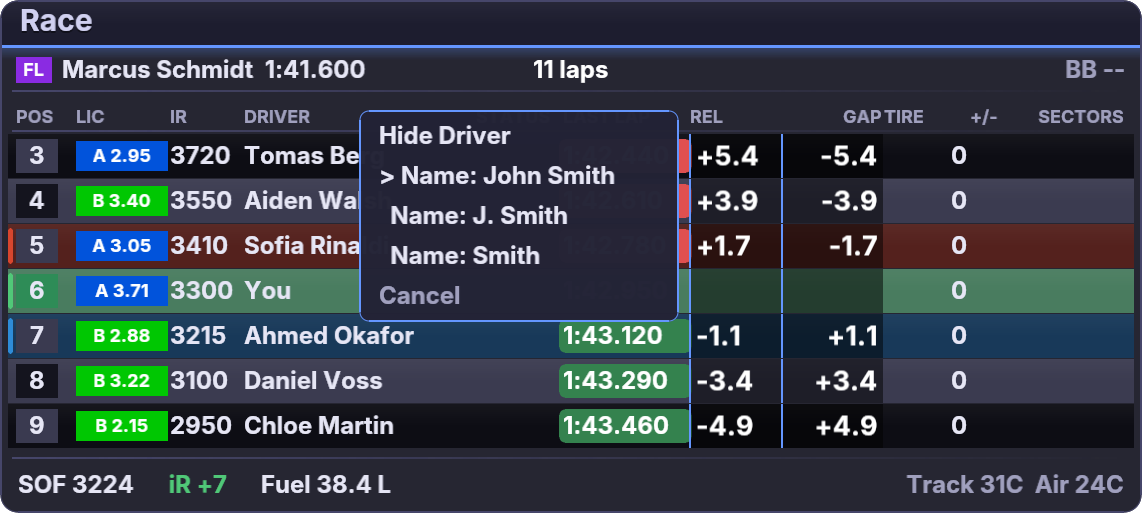
The available columns are: Position, License, iRating, Driver, Status, Best lap, Last lap, Relative, Gap, Tire, Positions gained and Sectors. Some only apply to the race or only to qualifying.
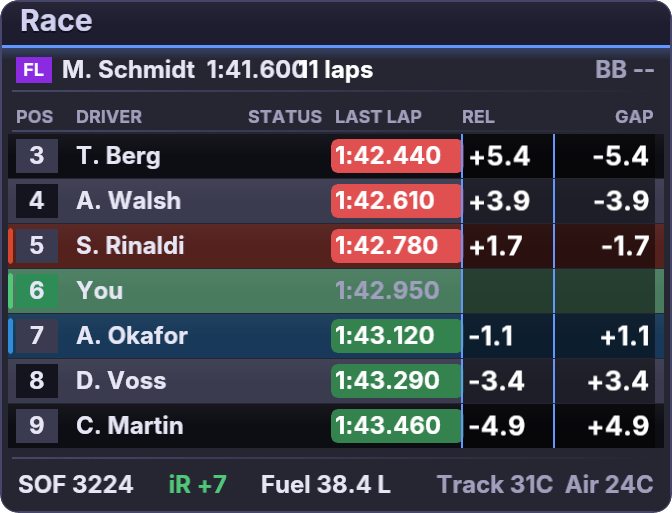
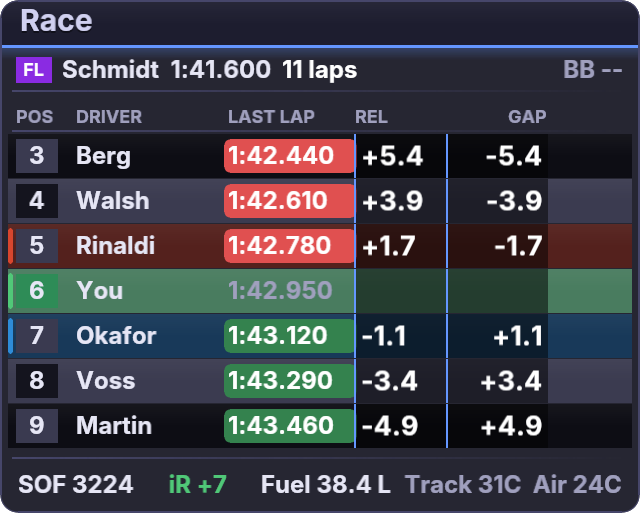
Rows, size and look
- How many cars: drag the short bar along the bottom edge down or up. The panel grows or shrinks by whole rows, from 3 to 40.
- Overall size: drag the grip in the bottom-right corner (40–300%).
- Headings: right-click the panel and choose Hide headings to drop the POS / LIC / DRIVER row, or Hide title bar to drop the title.
- See-through: use the opacity buttons on the selected panel.
- When it shows: use the Show button to limit it to practice, qualifying, the race or the replay.
- Text: font and size for every panel are in HUD Settings.
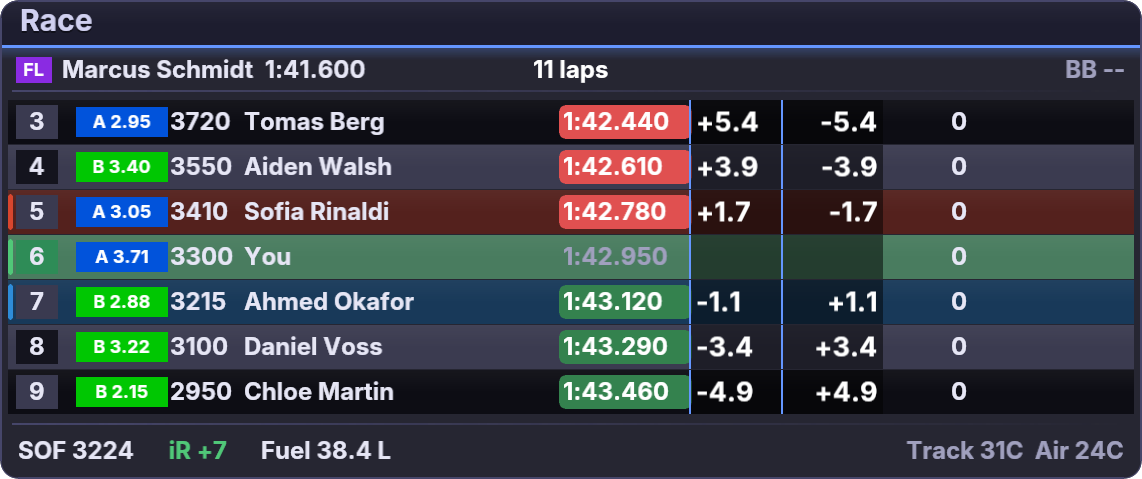
Friends and rivals
Click a driver's row on the Standings board to open a menu. Mark as friend or Mark as rival paints that driver in your chosen colour, in the standings and also in the Race box if Tag colours in Race / Qualifying is on. In the picture, the friend is blue and the rival is red. The same menu has View from here to look at the race from that driver's car, Blame… and Praise…, and Clear tag. Set the colours and tint in HUD Settings.
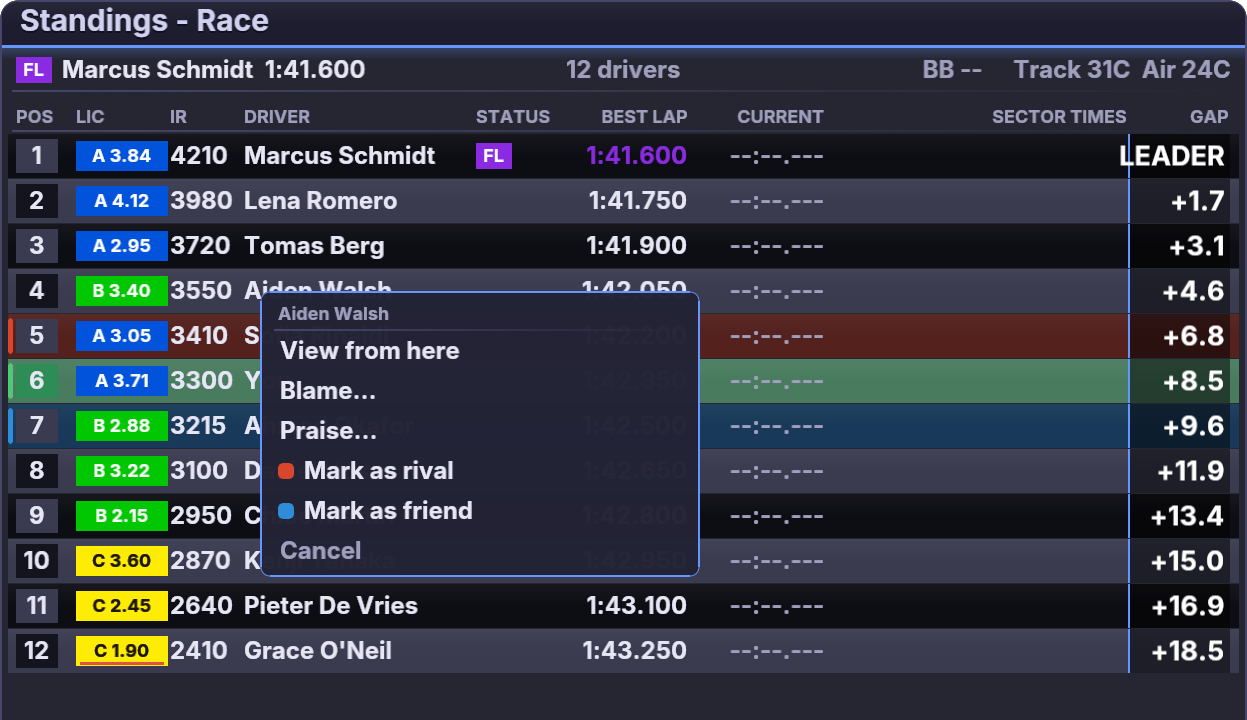
09Using the Incidents box
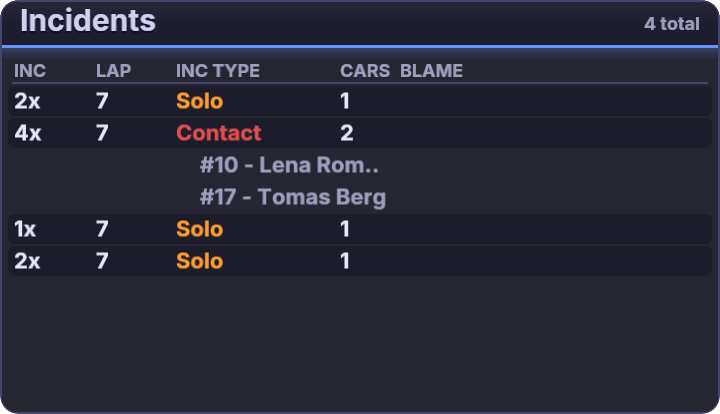
The Incidents box keeps a list of every incident scored this session and lets you review each one. It appears in replay by default, because that's when you want it, and it collects incidents all the time whether it's on screen or not.
Reading the list
- Solo: one car scored points on its own (a spin, a wall, off track).
- Contact: two cars scored the same points at nearly the same place and time. The cars are listed beneath the row.
- With no way to scroll in VR, the box shows the last page of the list, newest at the bottom, and an incident is never split from its cars.
Reviewing an incident
- Watch it back. Left-click an incident row. The replay jumps to about three seconds before it and puts the camera on the car that scored.
- Decide whose fault it was. Right-click the row to open the blame menu: Accept blame (your fault), Blame other driver, Racing incident, and Clear blame if you've already set one.
- Pick the driver. After Blame other driver, you get a list of the cars that were close. Cars marked * probably touched, and they come first. Choosing one sends the replay camera to that driver so you can watch what they did.
- Pick the reason. Overly aggressive, Dive bomb, Driving slow, Doesn't hold brakes, Unsafe rejoin, Deliberate wrecking, Reckless, No awareness or Unforced error. The verdict shows in the BLAME column.
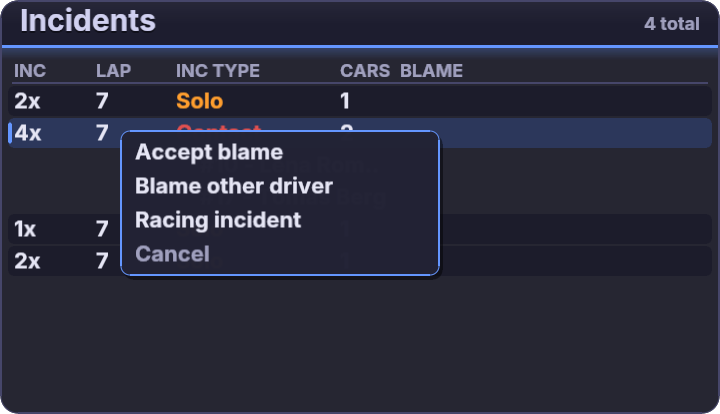
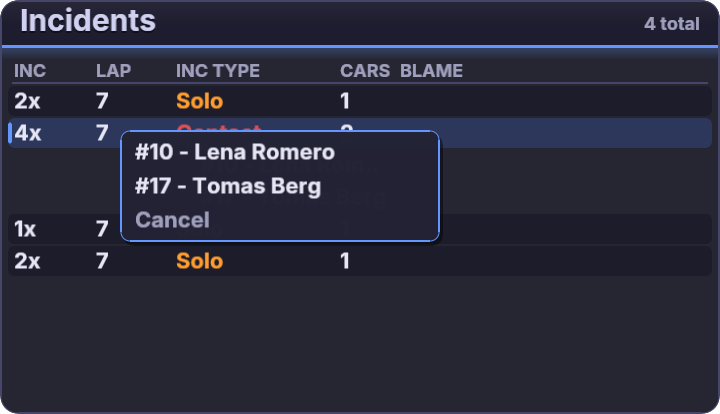
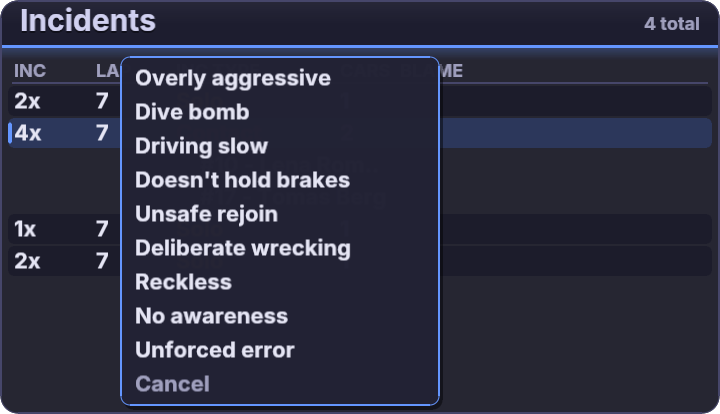
Why bother
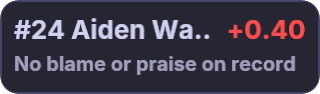
The verdicts add up. Car Ahead and Car Behind show a driver's blame and praise record, as in "No blame or praise on record" in the earlier picture, so you know who to give room to. You can also add praise (Good drive, Good awareness, Good side-by-side battling) from the Standings menu. Combine it with Mark as rival to keep track of the drivers you race with.
10Using the GPU box to get the most from your system
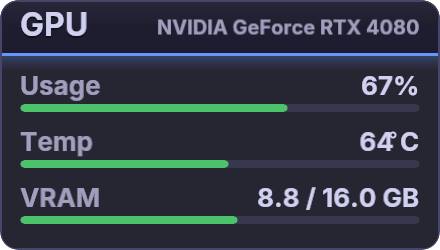
The overlay shares your graphics card with the sim, so the GPU box shows what the whole system is doing while you drive. It reads the first NVIDIA GPU once a second. Without an NVIDIA GPU and driver it just says "No NVIDIA GPU".
| Reading | Turns amber | Turns red |
|---|---|---|
| Usage | 80% | 95% |
| Temp (bar covers 30–95°C) | 75°C | 83°C |
| VRAM (used / total) | 85% | 95% |
How to use it
- Take a baseline. Place the box where you can see it, run a typical session with your normal panels, and note the three bars. Put it on a Show mode like Practice so it doesn't clutter races.
- If Usage stays red, the sim and the overlay are fighting for the GPU. Lower the DPI first. The canvas is size × DPI, so halving DPI quarters the pixels. Check that text is still readable.
- If VRAM is red, the canvas is too big. Shrink the Width and Height, or drop the top and bottom screens in a triple layout, because each one adds a band of canvas. A 4 m wide flat overlay at 768 DPI is about 3072 × 922 px, and adding a top and a bottom screen makes it about 3072 × 2458 px.
- Trim what you draw. Use Hide or the Show modes so each panel only exists when it's needed (the Incidents box is replay-only for this reason). A panel that is out of its Show mode is left out of the overlay completely. The overlay also only redraws a panel when its content changes, and is capped at 30 frames per second.
- Mind the temperature. If Temp is climbing towards red, the cause is airflow or the sim's own settings, not the overlay. Use the box to confirm it before you change anything.
- Close the Preview window when you're racing. It's only for checking your layout on the desktop.
11Troubleshooting
- Status says “OpenXR overlay is off”. Tick Enable OpenXR overlay in Preferences → OpenXR.
- Stuck on “Waiting for OpenXR app…”. Start the VR game after the app. Check the game uses OpenXR with Direct3D 11. If you moved the app folder, restart the app so it re-registers the layer.
- Curved is greyed out. Your headset's OpenXR runtime has no cylinder layers. SteamVR is one. Use Flat or Triple instead.
- Overlay is off to the side or behind you. Look straight ahead and press Recenter.
- Edit cursor doesn't match the game's cursor. Use Calibrate mouse.
- Blurry text or GPU load too high. Raise or lower DPI. See the GPU section for what else helps.
- Two copies of the layer installed. The app removes stale registrations on start. Restart it to clean up.